


Introduction
Welcome to our in-depth Deep Stone Crypt Raid Guide. The newest Destiny 2 raid releases 21st of November 2020. A fast paced activity that swarms you with enemies, from what we have seen it’s going to be really interesting and interactive to play through! Taking place in the Deep Stone Crypt, this is the newest raid in the franchise and the first raid of the Beyond Light expansion. Everybody is getting ready for its release by farming higher power level and better gear for when it launches. So if you are lacking in the former or latter feel free to check out what we have offering in our Beyond Light Boosting Section.
Encounters:
This Raid has 5 encounters, 4 of them are facing bosses meanwhile the first one is an ads clear. We will go through them all in-depth so you can conquer them with ease!
The Sparrow Encounter
Once you go into the raid you will notice that its quite important to have a good and fast Sparrow because you will need it for the next encounter. You will notice a sort of bubble barrier after heading down with a few Pikes laying there, the Pikes aren’t mandatory for the next encounter. They are there for a future Thriumph completion, simply guessing. Use your Sparrow instead, you will have a far easier time. After leaving the bubble you will notice there is a debuff called Frostbite appear on your left side. The goal of beating this debuff is going from the initial bubble to the next one which makes it disappear. Dying isn’t a problem either, you will simply respawn at the previous bubble whenever that happens so just try to spot the next bubble and rush them. Don’t forget in the bubbles there are ads and the first 2 people that get there should make way for the rest and continue ahead.

Crypt Security Encounter:
The first real challenge is the Crypt Security encounter. The zone is like an arena, split in two sides. One is lighted and one isn’t. We will call them Light and Dark sides. Before starting the encounter you should split between sides because doors will shut and you can’t pass between. To start the encounter you can pick up a buff called Operator (as shown in the pictures) which will be quite important. Once you pick it up you can transfer the buff to other players with the other terminals, but remember you can’t pick it up again yourself. Enemies will continue spawning during the whole fight. Occasionally an enemy with a buff over his head will spawn that you need to pay attention to. This unit drops a buff called Scanner (as shown in the pictures) which should be picked up by another person other than the Operator. The Operator can shoot data pads that open doors and do other mechanics, the Scanner can see which data pads are the correct ones and should at all times instruct the Operator which ones to shoot. The Operator will have to go in the top room and then enter in the middle door going below the area. Only 1 person can be in there at a time which is the Operator. The Scanner that stands on the top side of the area can use the small windows on the floor to tell the Operator which data pads to shoot. They will show as glowing yellow, meanwhile the wrong pads don’t glow at all. If the Operator shoots the wrong pad, he will get torched to death by the room filling with fire and dying. If you coordinate well it shouldn’t be hard.


ATRAKS-1, Fallen Exo Encounter:
The next encounter is the hardest one in the whole raid called ATRAKS-1, Fallen Exo.
The arena zone you enter is only half of the encounter. You can travel throughout the arena with the drop pads you will easily notice. The Boss will show up everywhere, so don’t panic. He has cloned himself and will show up at multiple slots at the same time. Again you have to use the Operator and the Scanner buffs (O and S for short) to pass this encounter. To spawn the adds that will have the O and S buffs you first need to clear all ads on the bottom side of the bottom arena in order to spawn the Servitors. Once they are killed, Servitors will start spawning on the top area as well. Meanwhile Servitors spawn, ads that have the O and S buffs will start spawning. Bottom area should have the Operator buff, top area should have the Scanner buff. Once both buffs are acquired, all bosses will start doing a raid wipe mechanic in order to wipe the whole raid but only the Scanner can see which one is real. Shooting the real boss causes him to take damage and to stop the actual raid wipe. Continue communicating and you will get used to doing it. That’s the Scanner’s job, meanwhile the Operator needs to pay attention to something else. From time to time a purple sphere will spawn that needs to be soaked by 1 member. Once the sphere is soaked a timer of 20 seconds will show on the left side as a debuff, if the timer runs out the player dies and a copy of the boss spawns on his spot. What needs to be done to prevent this is both the purple player and the Operator need to go to the top side of the area (only works there) and the Operator needs to shoot the player with the purple aura meanwhile standing in the airlock and once damaged enough the aura will disappear and the sphere gets shot out in space.
Repeat both mechanics until the end and you are done.
Prevent Europa’s Destruction Encounter:
In the following encounter there is a big boss in the middle but fear not you are not killing him directly. You just need to do something specific 4 times in a row to beat him. So you can drop your boss damage weapons and equip some of your ads clearing gear. In this encounter you are going to have O and S buffs again but this time there is another buff, a blue buff called Suppression. Split the group 2 people buff Operator, 2 people buff Scanner and 2 buff Suppression. Each group needs to do their own job. What the Operator does is shoot the data pads on Nuclear Cores that start charging soon after the encounter is started. The Scanner as always, will instruct the Operator which data pad is the correct one. Once completed, one person should go ahead and pick up the Core. Whomever has the Core picked up can’t run, can’t double jump and will get a debuff called Radiation which causes him to die if the debuff hits 10 stacks. The picked up Core goes in the correct pod that the Scanner announces which glows yellow. This is where the Suppressors show up. The Suppressor’s job is to shoot one of the 3 baloon kind of spheres that glow, stand below it and shoot the boss with your Suppression buff. If you do this 3 times under each baloon/sphere then the boss will be stun and the carrier of the Core can put the cores down in the correct Pad. Repeat this 4 times and you will finish the encounter.

TANIKS, The Abomination Encounter:
The last encounter of the raid is TANIKS, The Abomination.
As all other encounters, in this one you will also use the Operator, the Scanner and the Suppression buffs as well. In this fight there are 6 pods where you can drop Nuclear Cores in and only 2 of them will be the correct ones at a time. Again the Scanner can see which ones are the correct ones. Keep an eye out on the big purple circles that the boss is doing because they will kill you. In order to spawn a Nuclear core, you need to damage the boss’ thrusters. He has 4 total, 2 in the front and 2 in the back. Communicate which thursters are you damaging in order to make the Nuclear Core spawn, do not damage both sides because you won’t be able to use both Cores.
As you try to get close to the boss you will notice a purple sphere holding you back, this is the job of the Operator. Shoot the spheres to allow people to move pass them. Remember the walk is long and always have 1 person ready to swap the Core so the first person doesn’t die from Radiation. The Suppressors’ job is similar, stand under the baloons and shoot the baloons. Shoot the boss under 3 baloons, stun the boss, plant core. After doing this mechanic twice, he will kind of summon an electric field with debris flying around that will one shot you if you get hit. You need to stand in between the circle of the boss and the outside of the electric field. You get 3 chances of doing this before he enrages so use big damage weapons.
And with that the final encounter of the raid is complete!

Best recommended build for the Deep Stone Crypt Raid:
Warmind Cell Build
The Warmind Cells is for sure the best build you can use for this raid. We highly recommend using these as you are able to make cells that allow you to completely ignore
past things such as decreased damage and incerased incoming damage.
Don’t forget Solar and Arc mods conflict and you shouldn’t use them together! Having the Grasp of the Warmind will be canceled out if you are using any Arc Warmind that collects the cells.

Recommended Mods for the Warmind Build
Grasp of the Warmind – This allows you to pick up and hold Warminds forever, you wont reset or disappear. You have a total of 45 seconds to benefit from 1 Warmind cell.
The added effects (extra damage, extra defensives etc) allow you to stand when holding a Warmind Cell. Don’t forget to destroy the thrown Warmind before it explodes when sticking to enemies.
Warmind’s Longevity – With this mod your Warmind will stay up to additional 10 seconds, from 15 to 25. This allows you to use the Warmind cell for a damage phase completely.
Cellular Suppression – Absolutely a must have. This mod allows you to suppress enemies within the Warmind’s radius for 11 seconds. You can re-use this every 4-5 seconds meaning you can CC an entire area endlessly.
This mod makes the cells more resilient to your shorts. Also something most people dont know is there is a hidden perk that allows the Warmind cell to follow you after shooting it if you are close to it.
Power of Rasputin – Its a simple mod, you do more damage. 20% flat boost, if you don’t need damage, skip this mod.
Warmind’s Protection – You take less damage, about 20%. Same as Power of Rasputin this is a simple mod. Also in encounters that you get shot 3-4 times, this mod allows you to survive a few extra shots.

Best setup for the we suggest you should use if running Warmind:
Global Reach – All – one person only, everybody else uses Cellular Suppresion – Void
Warmind’s Protection – Void
Grasp of the Warmind – Void – one person only – everybody else uses Power of Rasputin
Warmind Longevity – Void – one person only – everybody else uses Charged with Light mod – Taking charge – All
High-Fire Energy – All – everybody else except the main person with the build
Only one person should run Seventh Seraph Weapon, preferably the person with the Warmind Build.

Recommended weapons to use in the Deep Stone Crypt Raid:
We have a different page dedicated for the best weapons for the raid, you may take a closer look and insight to what we recommend and suggest using here.
Basically follow the recommendations we have there and you will surely be able to improve your gameplay by a huge margin!
Best secondary option good perks:
Depending on your build, there are a few perks you would have to use for certain weapons.
Vorpal Weapon – Good against bosses and amplifies your damage 10%-15%.
Rampage/Kill Clip – Good against clearing ads.
Fourth Times A Charm/Triple Tap – A clear must for energy snipers. They allow you to turn 7 shot mags into 11 shot mags.
High Impact Reserves – With this your shots will deal more damage, example your Ikelos Sniper will deal up to 2k more damage.
Full Court – Full Court can be used only on some grenade launchers but its really worth it. As previously mentioned it will do up to 20k damage per shot if positioned right.
Field Prep – More ammo and reload speed when crouched, really recommended if you dont want to get extra ammo mods.
Spike Grenades – Directly hitting a target will deal the most damage of all grenade launcher perks.
These are the ones we recommend, everything else is up to you. There are other good perks such as Multi-Kill Clip but with a maxed out reload those extra few seconds won’t do any difference.
Best exotics for each class:
There are many options for exotics that people can use, however these are the ones we recommend.
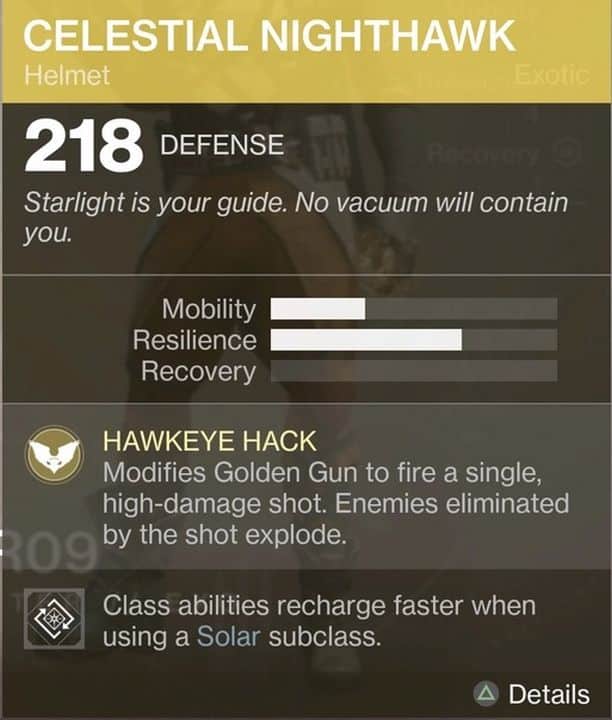
Hunter – Highly suggested to have a good Celestial Nighthawk and Orpheus Rigs. You will do a lot of damage while running them and you will get 50% of your super refunded when tethering 10+ enemies.
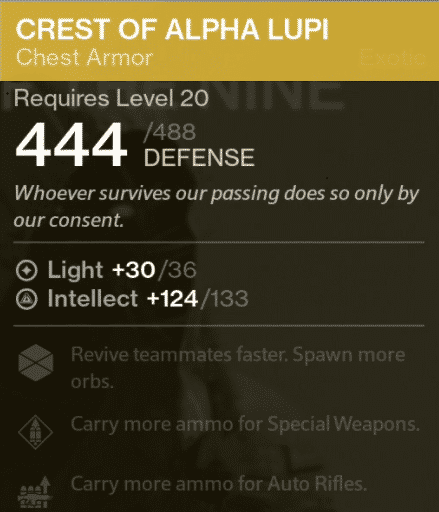
Titan – You want to focus on dealing damage, so you should be running Crest of Alpha Lupi. Creating orbs is what you really want to go for. Since that activates your High-Fire Energy or Protective Light build.
Warlock – You should use Phoenix Protocol, you can get up to 75% of your super refunded and it makes orbs for your team which allows your builds to work.
These exotics are the recommended and reliable if you are running Charged with Light Builds alongside 1 main Warmind.


Click on the images above to enlarge them.
Thank you for reading our in-depth Destiy 2: Beyond Light – Deep Stone Crypt Raid Guide!
Hopefully the information provided will help you take down this magnificent raid and manage to conquer it.


